
Automatically convert keywords into ClickWhale links across your website.
The Keyword Auto Linker lets you assign keywords to your ClickWhale links and automatically converts matching words or phrases into clickable links on supported areas of your website.
With the Keyword Auto Linker, you can:
- Automatically link keywords in posts, pages, and custom post types.
- Control where keywords are processed, including archive pages and other supported content areas.
- Manage keyword linking without editing your original WordPress content.
Note: The Keyword Auto Linker is available with ClickWhale Pro.
🎥 Prefer to watch instead?
Watch the video tutorial below to learn how to assign keywords, configure the global settings, and see how the Keyword Auto Linker works on your website.
Whether you prefer watching or reading, here’s a complete guide to help you use ClickWhale’s Keyword Auto Linker. 👇
How the Keyword Auto Linker Works #
The Keyword Auto Linker works with ClickWhale’s Link Manager to automatically convert assigned keywords into clickable links across your website. After you assign keywords to a ClickWhale link, the plugin scans supported content and generates links dynamically when visitors view the page.
The process is simple:
- Create a ClickWhale link and set its destination URL.
- Assign one or more keywords to the link.
- Choose where the Keyword Auto Linker should process those keywords.
- Visit your website to see the assigned keywords automatically converted into clickable links.
Note: The Keyword Auto Linker does not permanently modify your posts or pages. Links are generated dynamically on the frontend, so your original WordPress content remains unchanged.
If you haven’t created a ClickWhale link yet, see our How-to Shorten Links and Create Redirects guide before continuing.
Assign Keywords to a Link #
Once you’ve created a ClickWhale link, you can assign one or more keywords that will automatically be converted into clickable links across supported areas of your website.
To assign keywords:
- From your WordPress dashboard, go to ClickWhale → Links.
- Create a new link or edit an existing one.
- Open the Keyword Auto Linker tab.
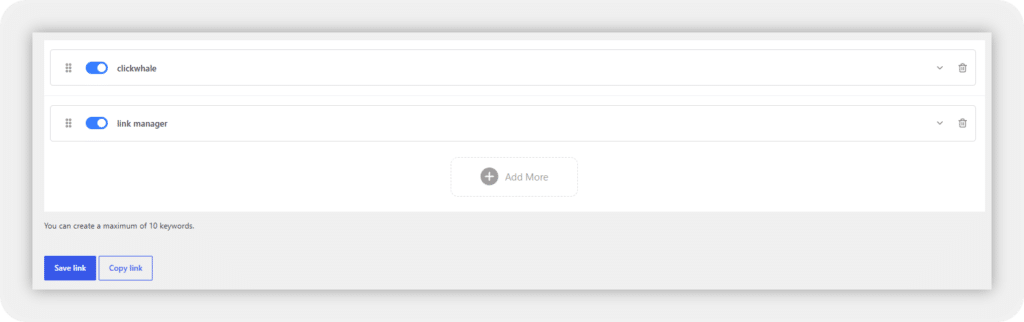
- Enter the word or phrase you want ClickWhale to automatically link.
- Select Add More to assign additional keywords, if needed.
- Click Save Link to apply your changes.
Note: You can assign up to 10 keywords to a single ClickWhale link.
Tip: Choose keywords that are relevant to your destination page and review the affected content after saving to ensure links appear in the intended locations.
View Assigned Keywords #
After assigning keywords to a ClickWhale link, you can quickly review them from the Links overview page.
To view the assigned keywords:
- From your WordPress dashboard, go to ClickWhale → Links.
- Locate the link you want to review.
- Check the Keywords column to see the keywords currently assigned to that link.
If you need to update the assigned keywords, edit the link, open the Keyword Auto Linker tab, make your changes, and click Save Link.

Configure the Global Keyword Auto Linker Settings #
The global Keyword Auto Linker settings let you control how and where ClickWhale automatically converts assigned keywords into links across your website.
To access these settings:

Available Settings #
Disable Keyword Auto Linker #
Enable or disable the Keyword Auto Linker without removing your assigned keywords. When disabled, ClickWhale will stop automatically converting keywords into links until the feature is enabled again.
Replacement Limit #
Set the maximum number of keyword replacements allowed on a single page. This helps prevent the same keyword from being linked too many times within the same piece of content.
Link Target #
Choose whether automatically generated links open in the same browser tab or a new tab.
HTML Headings #
Enable or disable keyword replacements within HTML heading tags (H1–H6). Disable this option if you don’t want keywords in headings to become clickable links.
Archive Pages #
Choose whether the Keyword Auto Linker should process keywords on archive pages, such as category or tag archives.
Front Page #
Enable keyword linking on your website’s front page.
Blog Page #
Enable keyword linking on the page assigned to display your latest blog posts.
Post Type #
Select which post types the Keyword Auto Linker should scan for assigned keywords, including posts, pages, and supported custom post types.
ACF Fields #
Enable keyword linking within supported content stored in Advanced Custom Fields (ACF).
Tip: After saving your settings, visit a page containing one of your assigned keywords to verify that the links appear as expected. If you don’t see the changes immediately, clear your website, server, or CDN cache.
See the Keyword Auto Linker in Action #
Once you’ve assigned keywords and configured the global settings, ClickWhale will automatically convert matching keywords into clickable links when visitors view your website.
For example, if you assign the keyword “ClickWhale” to one of your ClickWhale links, any matching occurrences of that keyword within supported content areas can automatically become clickable links on the frontend.
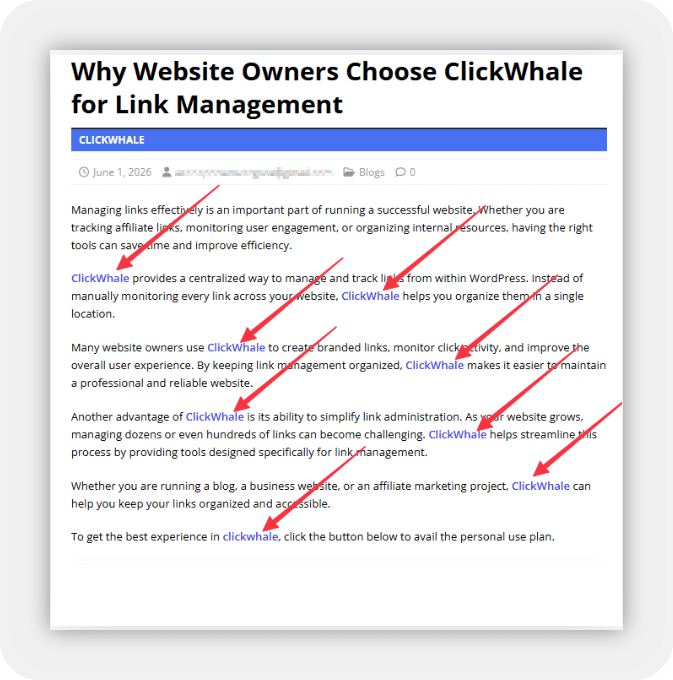
Note: The Keyword Auto Linker generates links dynamically when the page is displayed. It does not permanently insert links into the content stored in the WordPress editor or database.
Because these links are generated on the frontend, they won’t appear in your saved post or page content. As a result, the Link Scanner cannot detect automatically linked keywords.
If you’d like to learn more, see our guide on Understanding Link Scanner Results.
FAQs #
What is the Keyword Auto Linker?
The Keyword Auto Linker automatically converts assigned words or phrases into ClickWhale links when visitors view your website. The links are generated dynamically on the frontend, so your original WordPress content remains unchanged.
Do I need to create a ClickWhale link first?
Yes. Before assigning keywords, you’ll need to create a new ClickWhale link or edit an existing one through the Link Manager.
Does the Keyword Auto Linker modify my content?
No. The Keyword Auto Linker does not change the content stored in your WordPress editor or database. Instead, it generates links dynamically when the page is displayed to visitors.
How many keywords can I assign to a single link?
You can assign up to 10 keywords to a single ClickWhale link. To add more than one keyword, use the Add More option in the Keyword Auto Linker tab.
Can I limit how many times a keyword is linked?
Yes. Use the Replacement Limit setting to control the maximum number of times assigned keywords are automatically linked on a page
Can I choose where keywords are automatically linked?
Yes. The global Keyword Auto Linker settings allow you to choose where keywords are processed, including supported post types, archive pages, the front page, the blog page, HTML headings, and supported ACF fields.
Can I prevent keywords from being linked inside headings?
Yes. Disable the HTML Headings option in the Keyword Auto Linker settings if you don’t want keywords inside heading tags to be converted into links.
Can automatically generated links open in a new tab?
Yes. Configure the Link Target setting to choose whether automatically generated links open in the current tab or a new browser tab.
Why isn’t my keyword being converted into a link?
If a keyword isn’t being linked, check the following:
- The keyword has been assigned to the correct ClickWhale link.
- You clicked Save Link after adding or updating the keyword.
- The Keyword Auto Linker is enabled in the global settings.
- The appropriate post type or content area is enabled.
- The replacement limit has not been reached.
- Your website, server, or CDN cache has been cleared.
Why doesn’t the Link Scanner detect auto-linked keywords?
The Link Scanner only checks links stored in your WordPress database. Since the Keyword Auto Linker generates links dynamically on the frontend, those links don’t exist in the saved content and therefore aren’t detected by the scanner.
Can I temporarily disable the Keyword Auto Linker?
Yes. Go to ClickWhale → Settings → Keyword Auto Linker, disable the feature, and save your changes. Your assigned keywords will remain attached to their ClickWhale links and can be re-enabled at any time.


